How to Start a Travel Blog for Beginners: A Step-by-Step Guide

Wondering how to start a travel blog? Well, you can learn from me, especially if you’re a beginner! I’m Jackie, the travel blogger behind this website, Jou Jou Travels. I started this project of sharing my tips on travel, discovering hidden gems, and how to gain the bravery to travel solo almost 5 years ago. It’s something I’m very passionate about, and if you want to be successful at it too, you must have that same passion. It’s not an easy thing and takes years of hard work.
I’m so happy to say I’ve monetized my blog and earn a stable living from it, making 5 figures a month doing what I love. Since I get asked all the time how I’ve done it, I decided to make this handy post. Starting a travel blog might sound daunting, but in this blog post, I’ve laid out the step-by-step process for you.
Even if your blog isn’t about travel, these steps apply to any niche, whether it’s food, wellness, fashion, or something else.
👉 And if you’re still struggling to do it yourself, I can set it up for you as I offer that service for $549. You can hire me using the link here!
Just a heads up! This post may contain affiliate links, meaning I get a commission if you decide to purchase something through the links, at no additional cost to you. Your support helps me continue doing what I love ♡. Thank you! Read our Affiliate Disclosure here.
Best Travel Blogging Resources
– BEST SEO travel course: Learn SEO from the start with the Salty Academy by @saltinourhair.
– Travelpayouts: This is my go to for building affiliate links with hundreds of programs to choose from (booking.com, GetYourGuide, Car Insurance providers, etc.)
– Stay22: I specifically use Stay22 for their AI pop-up feature. It leaves behind a link to a booking site in the background while they read your blog. This has earned me an extra $1-2K a month.
– FREE Influencer course by @professionaltraveler
– Become part of GetYourGuide’s travel community and unlock access to FREE activities, tours, and even paid opportunities! If you have at least 3,000 followers on social media, you can apply to join.
– Travel the world for free: Join TrustedHousesitters and get complimentary stays in exchange for pet sitting.
– Lyrical Host: My top choice for fast and reliable web hosting. Use code JOUJOUTRAVELS10 to save 10%1
– Keysearch: A must for discovering seo search terms that will actually rank. Use code KSDISC to save 20% off your membership!
– LinkDM – An Instagram automation tool that lets you send blog links straight to people’s DMs when they comment a keyword on your post. A simple way to turn followers into blog readers.
👉 Book a coaching call with me to learn my best tips to grow your account! Don’t struggle to get on the right path.
Step 1: Define your niche + brand
Pick a focus for your travel blog
Step one on how to start a travel blog is to pick a focus! I get it—you probably want to write about everywhere you visit. But in the beginning, it really helps to narrow your niche. This could mean focusing on budget travel in Europe, solo travel, outdoor adventures, or even just one city or country.
Starting with a clear focus builds your authority in Google’s eyes. The more content you create around a specific theme, the higher your chances of ranking, compared to blogs that cover random topics here and there. You can always expand later, but niching down first will set you up for long-term success.
Name and brand pillars

Pick a name for your blog and grab the matching social handles (Instagram, TikTok, etc.) as soon as possible. Your name should reflect the identity and focus of your blog.
Mine is Jou Jou Travels with the tagline female solo traveler. That’s because my blog’s focus is on female solo travel and hidden gems. In all my posts, I try to share non-touristy things to do and share from the perspective of a solo traveler. I even have an entire solo travel section on my blog.
If you can, include your niche or location in the name; this can give you an SEO and branding advantage. For example, if your blog is about London, having “London” in your domain or handle will help you stand out against other creators who write posts like “4 Days in London” but don’t have it in their blog name.
Step 2: Purchase Your Domain Name
You will want to purchase your domain name (e.g. https://joujoutravels.com/) once you have chosen your blog name. I recommend going for a .com address if you can, as it’s more professional and more commonly used. You can buy a domain name from whatever host you go with. Even if you don’t buy it from the host you go with, it’s totally fine as they can still point your site to it.
Step 3: Purchase a Hosting Plan

Step 3 in how to start a travel blog is to purchase a hosting plan.
Think of your blog like a house. Your domain name (like joujoutravels.com) is the address people type in to find you, but hosting is the actual land where your house sits. Hosting is provided by a server, which is just a powerful computer that stores all your website’s files, photos, and text. Without hosting, your blog can’t “live” anywhere online.
Determining which hosting plan is right for you can be a bit confusing for new bloggers. There are so many different hosting companies, and you might be tempted to go for the cheapest and most well-known, Bluehost. However, they are actually known to be the worst for speed and customer service! Your site speed is critical for SEO, and having a good hosting company contributes to your speed.
I use Lyrical Host, which was highly recommended by Nina Clappeton, a blogger I adore for all her top seo tips. Their pricing is £13.99 ($19.49) a month, which may seem high compared to Bluehost or other web hosting companies. But there’s a gotcha to the cheaper hosting companies. They offer super low prices at first, like $5 a month. Then, after one year, they increase the prices drastically! Sometimes, you may auto-renew and not even realize the price increased a ton. See below the common providers and their 2nd-year pricing. As you can see, Lyrical Host is on par if not cheaper than, most hosting sites in the second year. Plus, you get so much more with it!
| Provider | Plan Name | 1st Year Price | 2nd Year Price | SSD Storage |
|---|---|---|---|---|
| Lyrical Host | Tiny Plan | £13.99 (~$19.49) with discount, it’s $17.54/mo | £13.99 (~$17.50) | 60 GB |
| Bluehost | Business | $6.45 | $14.95 | 50 GB |
| SiteGround | Grow Big | $4.99 | $29.99 | 20 GB |
| Hostinger | Grow | $3.79 | $13.99 | 50 GB |
| GoDaddy | Deluxe | $4.99 | $19.99 | 20 GB |
With Lyrical Host, the price you get in with is forever. They never up the price on you when you renew. You can use the coupon joujoutravels10 to save 10% with them when you sign up with this link. To save more money, I recommend buying 2 to 3 years upfront because the coupon will apply to the entire coverage period you select.
Plus, they have the most amazing customer service. They will help you with most things you ask of them, including optimizing your website speed. They went in and did a few things and suggested to me what I could do to pass the Google Core Metrics speed test. This web hosting plan is not only faster, but you also get daily backups of your website, security, more storage, and other benefits.
The other highly recommended web host is SiteGround. SiteGround is also highly praised for being fast and having good site speed. If you’re just starting out, their plans are $4.99 a month, and after the first year, it increase to $29.99 (more than the Lyrical Host price).
FYI: If you made the mistake of already purchasing a host like Bluehost or GoDaddy and want to make the switch to Lyrical Host or SiteGround, the transition is simple. When you purchase with another host, they usually handle the entire migration process for you. So, you don’t have to do much at all!
Step 4: Choose WordPress for your CMS
Your CMS (Content Management System) is the platform where you’ll create, organize, and publish all of your blog posts. Think of it as the “backbone” of your website — it’s where you’ll write your content, upload photos, and manage how everything appears to your readers.
The industry standard for blogging is WordPress.org, and it’s what I recommend for starting a travel blog. It’s free to use (included with most hosting plans), super flexible, and gives you full control over your site’s design, plugins, and monetization.
The hosting plans I’ve recommended above include WordPress.org for the CMS, free of charge. They are also installable in one click from the hosting plan. If you’re lost on how to do this, your hosting customer service should be able to help you.
Do not get confused and use the free WordPress.com because it is very limited and you won’t get your own domain name. It will show your URL as joujoutravels.wordpress.com, for example. Plus, you won’t have full control over your site, customization options are restricted, and it’s much harder (and more expensive) to monetize. With WordPress.org, you own your site, have access to thousands of themes and plugins, and get the flexibility to grow your blog into a business.
I would also advise against using Squarespace or Wix. That’s because, while they might look attractive at first with their drag-and-drop designs, they’re not as flexible and will not allow you to monetize your blog in the future with ad networks like Mediavine and Raptive. You’ll be limited in terms of customization, SEO control, and the ability to add advanced features. These platforms can also become more expensive over time if you need to upgrade for storage, bandwidth, or integrations. Plus, if you start out this way and switch to WordPress, it will be a HUGE pain. Trust me, a friend did it, and it seemed painful to switch over. She had to manually create her old posts due to the differing structure.
Step 5: Pick a Theme & Customize Your Website

Picking a good theme is critical to the success of your blog. You’ll want to choose one that’s fast, lightweight, and mobile-optimized. Often, the prettiest themes can be the slowest, which hurts both user experience and SEO.
I personally recommend themes from Angie Makes, Heartenmade, or 17th Avenue Designs for their clean designs, but for performance, I suggest going with a Kadence theme. Kadence is highly customizable, SEO-friendly, and designed with speed in mind, so you can have a beautiful site without sacrificing performance.
Your theme should come with instructions on how to install. Essentially, you will log in to your WordPress page (typically yoururl.com/wp-admin). Then, head to Plugins, and install the zip file of your theme where prompted. After, you can click Activate. There will be some adjustments you need to make to get it looking the way you want.
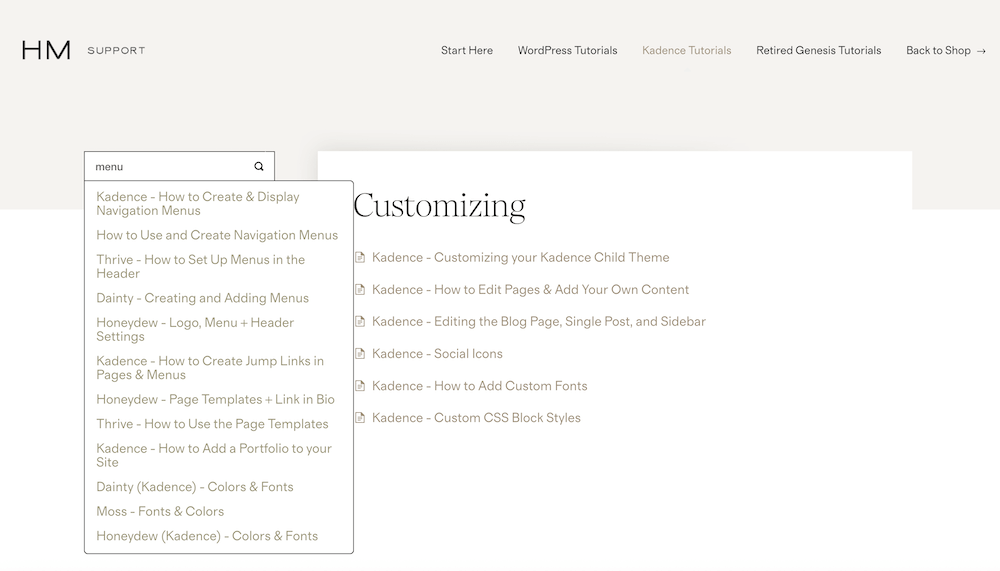
My theme came with instructions on how to customize my website. You don’t need to know coding at all. It’s much simpler than you think. You just need to head over to the help section of your theme, and it should have step-by-step documentation on most things you will need to adjust. That includes setting up menus, changing the home page, adding a widget, and so on. You can just search any topic within the support (as shown below!)
Step 6: Install Essential Plug-ins
A plugin is like an app you can add to your blog to give it extra features. For example, plugins can help with SEO, speed, security, or even adding things like contact forms. Plugins are specific to WordPress.org, which is one of the biggest advantages of using it — you’ll have access to thousands of free and paid options to customize your site however you like.
While it’s tempting to install lots of them, you should only add the ones that are truly useful (too many can slow down your site). Here are a few essentials I recommend:
- Yoast SEO (or RankMath) – helps optimize your posts for search engines.
- WP Rocket – improves your site’s loading speed.
- Smush (or ShortPixel) – compresses images so they load faster.
- UpdraftPlus – creates automatic backups of your site.
- WPForms – makes it easy to add contact forms.
Start with these basics and add others only when you need specific functionality.
Step 7: Create Core Web Pages
Once your website is all set up, you should create the following essential pages:
- About Me – who you are, why people should follow you
- Contact – for brands, collaborations, or readers
- Blog – where posts will appear. This will be available by default, FYI.
- Privacy Policy & Disclaimer – legally important
To make these pages, most themes will have the demo pages set up for you so you can adjust them. But, regardless, you’ll just head over to Pages in WordPress (yoururl.com/wp-admin < Pages) to add or edit pages.
Just remember, don’t create blog posts here; you’ll instead navigate to the Posts section in your WordPress CMS.
Step 8: Set Up Google Analytics
Once your blog is live, you’ll want to track how many people are visiting, where they’re coming from, and which posts they love the most. Google Analytics is a free tool that gives you these insights and more.
Setting it up is simple: create a free account, connect it to your website, and install the tracking code (or use a plugin like Site Kit by Google if you’re on WordPress). This data is essential if you want to grow your blog, as it helps you see what’s working and what needs tweaking.

I worked as an analyst for 10+ years, and it was my job to track website behavior for huge brands like Delta Air lines, CNN, and Cartoon Network. I made my own intuitive dashboard to track my blog stats. That’s because the Google Analytics interface isn’t the easiest to understand. My dashboard makes it simple, and you can filter by page, country, date, etc.
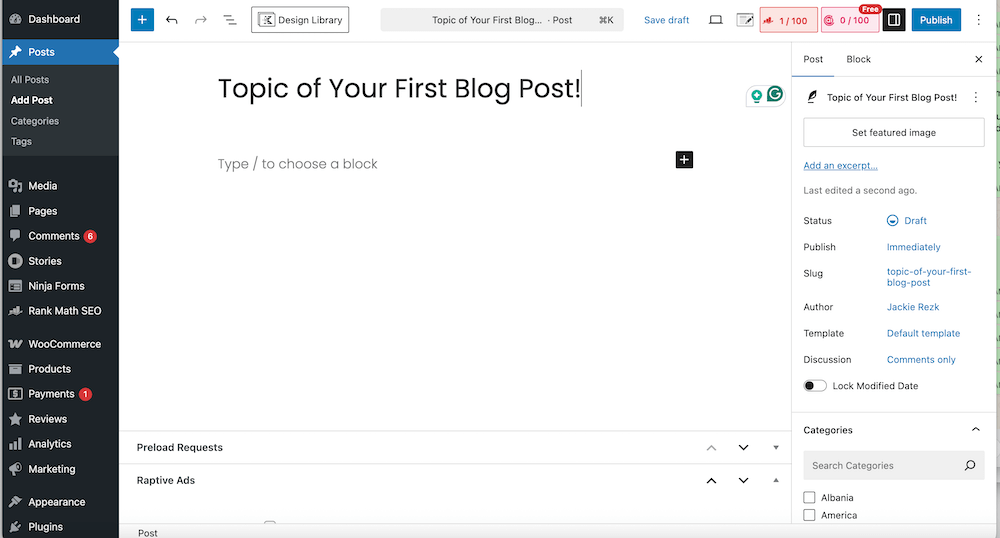
Step 9: Write Your First Blog Post & Get Traffic to It!
SEO & Google
When you sit down to write your first blog post, it’s not just about putting words on a page — you need to keep SEO (Search Engine Optimization) in mind from the very beginning. SEO is what helps your blog posts show up on Google when people search for travel tips, guides, or inspiration. Writing with SEO in mind ensures that all the hard work you put into creating content actually gets discovered. There’s no use in writing something only to find no one is reading it. 85% of my traffic is from SEO/Google.
I highly recommend learning SEO early on instead of figuring it out later. One of the best resources is The Salt Academy by @saltinourhair. They’re successful travel bloggers making over $30,000 a month in passive income, and their course breaks everything down in a way that’s easy to follow. I personally made the mistake of not learning SEO from the start, and I had to go back and update 40 posts — it was a massive headache that you can avoid if you learn the right way early on.
So, as you write your first post, think about what people are searching for, structure your content in a clear and helpful way, and use SEO tools (like the Yoast SEO plugin) to guide you. This will save you time in the long run and set your blog up for success.
I highly recommend using a tool like KeySearch to find out what people are actually searching for online. KeySearch helps you discover keywords — the words and phrases your audience types into Google when looking for travel tips, guides, or inspiration. By targeting the right keywords in your blog posts, you increase the chances of your content showing up in search results and attracting real readers.
The tool also gives you insights into competition (how hard it is to rank for a certain keyword) and search volume (how many people are searching for it). This is invaluable because it allows you to focus on topics that have both interest and opportunity, instead of guessing what people might want to read. You can save 20% off Keysearch by using this link and adding the coupon code, KSDISC, at checkout.
Instagram & FB
You can also drive traffic to your site through social media. For example, on Instagram and FB, I use a tool called LinkDM that automatically sends a direct message with the link to my related blog post when someone comments a specific word on my post. You’ve probably seen creators say things like “Comment GUIDE if you want the list”—that’s exactly how the automation works. It’s a super effective way to connect your Instagram audience directly to your website and get more eyes on your posts.
I also create Pinterest-friendly images at the bottom of all my posts to encourage readers to save my post to Pinterest. And, I also save all my posts to Pinterest daily to maximize reach to my blog.
Step 10: Start Monetizing Your Blog
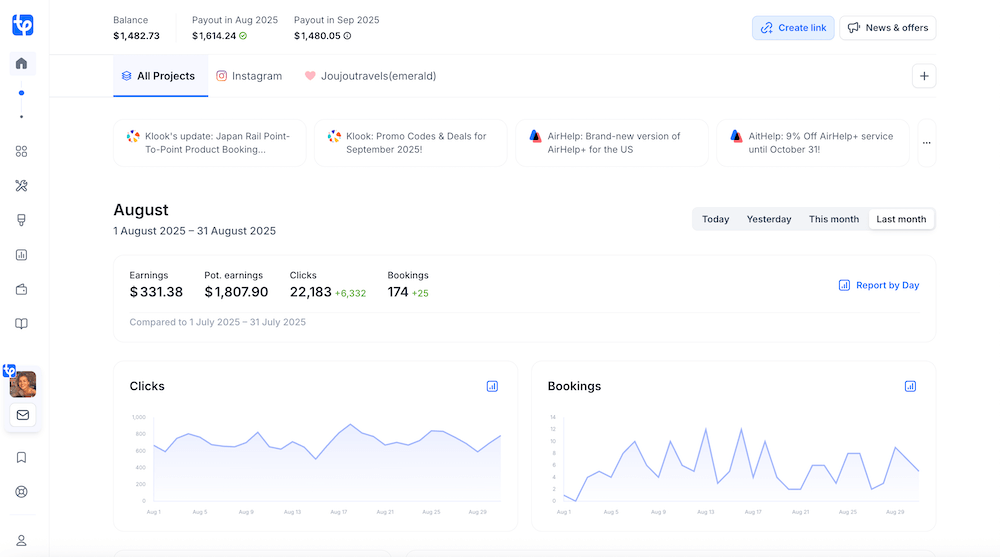
Once your blog has traffic, you can monetize via:
- Affiliate marketing (e.g., travel gear, tours on GetYourGuide/Viator, accommodation bookings): I use Travelpayouts and Stay22 for creating affiliate links. These platforms are the easiest tools on the market so you can earn passively. Read my Stay22 Review & TravelPayouts Review.
- Sponsored content with brands
- Display ads (Small bloggers can join SheMedia, Journey, or Raptive Rise; Big bloggers can join Mediavine (50k monthly sessions) or Raptive (100k Page Views)
- Selling your own guides or ebooks
Be sure to read my blog post on How to Make Money as a Travel Blogger, an in-depth read for more details.
If you also wish to be a travel influencer on Instagram, I have a guide on how I grew my account.
Also, I’d recommend the course I took to learn how to become an influencer.
Still struggling? Purchase a Blog Setup
Hopefully, this post on how to start a travel blog was useful! But I know some of the technicalities scare people. So if this post sounds like a lot, I can help. If you’re still struggling to do it yourself, I can set up your first blog for you. I offer that service for $549. You can hire me using the link here!